[vc_row][vc_column][vc_column_text]Oracle PPM Cloud, or Oracle Project Portfolio Management Cloud, gives you full control over all of your projects and project related contracts. Expenditure items in Oracle PPM Cloud are created in Project Costing, a part of Project Financial Management within PPM.
Expenditure items in Oracle PPM Cloud are project or contract costs, charges, or transactions.
So how do you create expenditure items in Oracle PPM Cloud? You will need to create project transactions.[/vc_column_text][vc_column_text]
How to create a project transaction
You can import transactions from other areas of Oracle by finding the Import Costs task. This allows you to pull import transactions from the following work areas:
- Payables
- Purchasing
- Cost Management
- Time and Labor
- Projects
- External Time Entry Systems
So, every time you purchase a good for a project, pay a supplier for project materials, bill a client for hours worked, or log time on a project, that information can be directly imported as an expenditure item. This saves an enormous amount of time on bookkeeping since Oracle is doing all the legwork gathering the data for you![/vc_column_text][vc_column_text]Note: You can also create project transactions by manually capturing project costs.
Five project costs
There are five different types of costs you can capture for a given project depending on your setup. The following lists the five different types of costs:
- Labor costs
- Nonlabor costs
- Labor costs for third party applications
- Nonlabor costs for third party applications
- Costed or accounted transactions for third party applications
To capture costs, you will need to navigate to the Capture Costs task in the Projects work area. When you select the Capture Costs task, you will see five options. The following list provides some details for the five costs you can create.
- Create Labor Costs – This task allows you to capture timecard batches.
- Create Nonlabor Costs – You can use this task to capture usages and miscellaneous transactions.
- Create Labor Costs for Third-Party Applications – This task allows you to create uncosted labor batches from third parties such as an External Timecard Entry system.
- Create Nonlabor Costs for Third-Party Applications – This task allows you to create uncosted nonlabor batches from third parties.
- Create Costed or Accounted Transactions for Third-Party Applications – You can use this task to import transactions that have already been costed or accounted for in the third-party application.
Note: Labor costs are everything directly related to salary, benefits, and contractor costs. Non-labor costs are everything else, including training, team building, and travel.
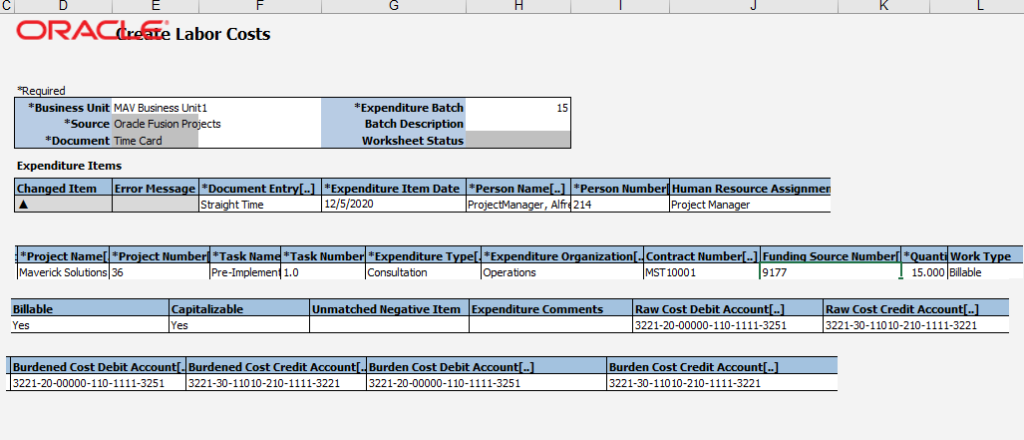
Selecting any of these options downloads a spreadsheet connected to Oracle through their ADF desktop plugin. In the spreadsheet, you will fill out all the necessary information to correctly import the transaction. The following screenshot displays an example of the spreadsheet for the Create Labor Costs task:
 [/vc_column_text][vc_column_text]In order to successfully import projects costs, you must choose an expenditure batch number and define the following:
- Business Unit
- Document Entry
- Expenditure Item Date
- Person Name/Number (Only required for Labor costs)
- Project Name/Number
- Task Name/Number
- Expenditure Type
- Expenditure Organization
- Quantity
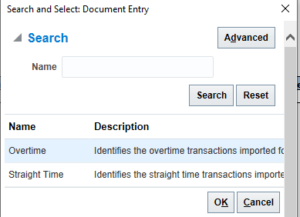
Note: The nine fields listed above are the minimum required fields for a successful upload.[/vc_column_text][vc_column_text]If you don’t know the values for the required fields, Oracle has the Search and Select feature. Good news! For most of the cells in the spreadsheet, and all of the required cells except for Quantity and Item Date, you can double click on the cell to open the Search and Select dialog. The Search and Select dialog allows you to search the Oracle server for the information at the time of need without changing windows or performing a scavenger hunt in the Oracle software. The following screenshot displays an example of the Search and Select dialog for the Document Entry field:

Note: If there are no asterisks next to the search field in the search and select dialog, you can select the Search button without filling out the search field to load all available data.
Once the spreadsheet is filled out, you will export the expenditure batch to Oracle Project Costing Cloud. When you export the spreadsheet using the ADF Desktop Integration, you will need to select the Process transactions checkbox. This uploads the transactions into Oracle Project Costing. If you do not select the checkbox after you have successfully exported the data from the spreadsheet you will need to run the Import Cost Process and Import Costs from Project Costing. The following screenshot displays the Process transactions checkbox:[/vc_column_text][vc_column_text]
How to confirm the costs imported or uploaded correctly
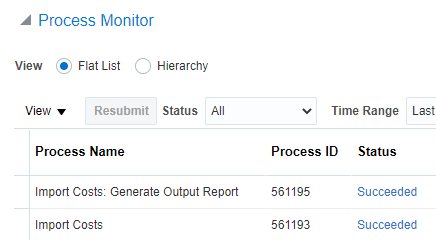
You can check on the status of the Import Cost process (the process created by both create transaction methods) by navigating to Scheduled processes or by accessing the Process Monitor table on the Costs work area. The following screenshot displays an example of the Process Monitor table:

The output report will inform you of any errors that may need to be addressed before the transactions can be correctly added to the system. The following list details some common errors that might occur:
- The accounting period is not open.
- The billable/capitalizable data does not match the project data.
- No resource rate has been defined for the person.
- Cost does not fall within budget constraints.
- Control budget was not defined.
[/vc_column_text][vc_column_text]
How to view and edit existing expenditure items in Oracle PPM Cloud
To view existing expenditure items in Oracle PPM Cloud, you will need to navigate to the Manage Project Costs task in the Costs work area. Once there, you can select any transaction number link to open and edit the corresponding expenditure item.
From the Actions drop-down list, you have the following options:
- Costing – You can hover over the Costing row to perform the following actions:
- Transfer which project or task number within a project the expenditure item is associated with.
- Split the expenditure item and change the quantity, billable, capitalizable, bill hold, and revenue fields.
- Reverse the transaction. If you perform this action, the software will not allow you to perform further edits.
- Recalculate raw cost, burdened cost, or converted cost amount.
- Change work type.
- Identify if a cost can be converted to capital and set the cost to Capitalizable.
- Identify if a cost can’t be converted to capital and set the cost to Noncapitalizable.
- Billing – You can hover over the Billing row to perform the following actions:
- Hold/release an invoice.
- Hold/release revenue.
- Recalculate invoice or revenue amounts.
- Refresh billing resources.
- Set the expenditure item to billing/nonbillable.
- Intercompany Billing – You can perform the same actions as the Billing drop-down list, as well as the following actions:
- Reprocess cross-charge methods.
- Mark for no cross-charge processing.
- Borrowed and Lent – You can access the following actions from the Borrowed and Lent row:
- Reprocess the borrowed and lent amount.
- Recalculate converted transfer prices amounts.
- Reprocess cross-charge methods.
- Mark for no cross-charge processing.
- Accounting – You can hover over the Accounting row to access the following actions:
- Post to ledger.
- Account in draft.
- View accounting.
- Comments – You can add comments to the expenditure item for teammates, so everyone is on the same page.
[/vc_column_text][vc_column_text]
How to associate expenditure items with a specific contract line
Expenditure items in Oracle PPM Cloud are automatically matched to associated contract lines during invoice and revenue generation as long as the expenditure item’s transaction date, billing resource, and amount pass the billing controls setup for that contract. A billing transaction is created in Oracle Project Billing Cloud for every unique combination of expenditure item and contract line. This means an expenditure item can be mapped to multiple contract lines.
How expenditure items appear on an invoice depends on your settings in the invoice format.
For example, you can group expenditure items on an invoice by:
- Expenditure type
- Job
- Person
- Work site
- Contract line
- Contract line project/task
Or a combination of the above.[/vc_column_text][vc_column_text]
Before you go: Expenditure items in Oracle PPM Cloud
An expenditure item is a transaction that has been costed for a particular project that can then be invoiced or recognized for revenue. You can create expenditure items in Oracle PPM Cloud by importing or capturing project costs. Expenditure items can be capitalizable and/or billable and can be transferred, split, reversed, or recalculated before they’re posted to the general ledger.
Want to learn even more? You are in luck! Maverick Solutions’ Oracle Project Financial Management Cloud course contains over 260 step-by-step walkthroughs of essential processes to run your projects effectively and efficiently. Nine of these are exclusively related to expenditure types and expenditure items. Two of those are:
- Creating labor expenditures using excel
- Splitting and transferring expenditure items
All our interactive tutorials take you through business processes with step-by-step instructions. This allows you to repeatedly practice without creating unnecessary data in your own server. Our in-depth content empowers your team to become proficient in Oracle Cloud and maximize your Oracle Cloud subscription.
You can get all of this and more with ENGAGE by Maverick. ENGAGE is Maverick Solutions’ subscription-based training content on all Oracle Cloud applications. ENGAGE is fully customizable, comprehensive, and available 24/7/365. We update your training content with each Oracle update so you and your team can be confident that training is current. If you want to know how Maverick Solutions can fit into your organization’s current or future Oracle projects, speak with one of our training experts today![/vc_column_text][/vc_column][/vc_row]


