First off, what is CPQ? CPQ stands for Configure, Price, Quote, and Oracle CPQ Cloud is Oracle’s one-stop-shop for exactly that.
In this article, we’ll go over how to create items in Oracle CPQ Cloud, as well as why items can help streamline your company’s price and quote flow.
What is the difference between Configure, Price, Quote, and Procurement?
Oracle CPQ Cloud is directly tied to Oracle Sales Cloud and is a part of Oracle Customer Experience (CX) Cloud. Oracle CPQ Cloud is how you create quotes to send to hot leads as part of your CRM funnel. Procurement, on the other hand, is directly tied to Oracle Supply Chain Management (SCM) Cloud and is used for sourcing parts. Any quotes and items that exist within SCM or Procurement are quotes and items that exist within your company and/or exchanged between you and your suppliers. CPQ, on the other hand, links you with your customers.
What are Items in Oracle CPQ Cloud?
Items in Oracle CPQ Cloud are the various components that have unique identifiers. Anything that needs its own price, its own barcode, or its own serial number is an item. Items can be physical goods, services, add-ons such as rebates and warranties, among others.
Creating Items in Oracle CPQ Cloud
Before we can talk about how and why having items in CPQ helps you, let’s cover how you create items in the first place.
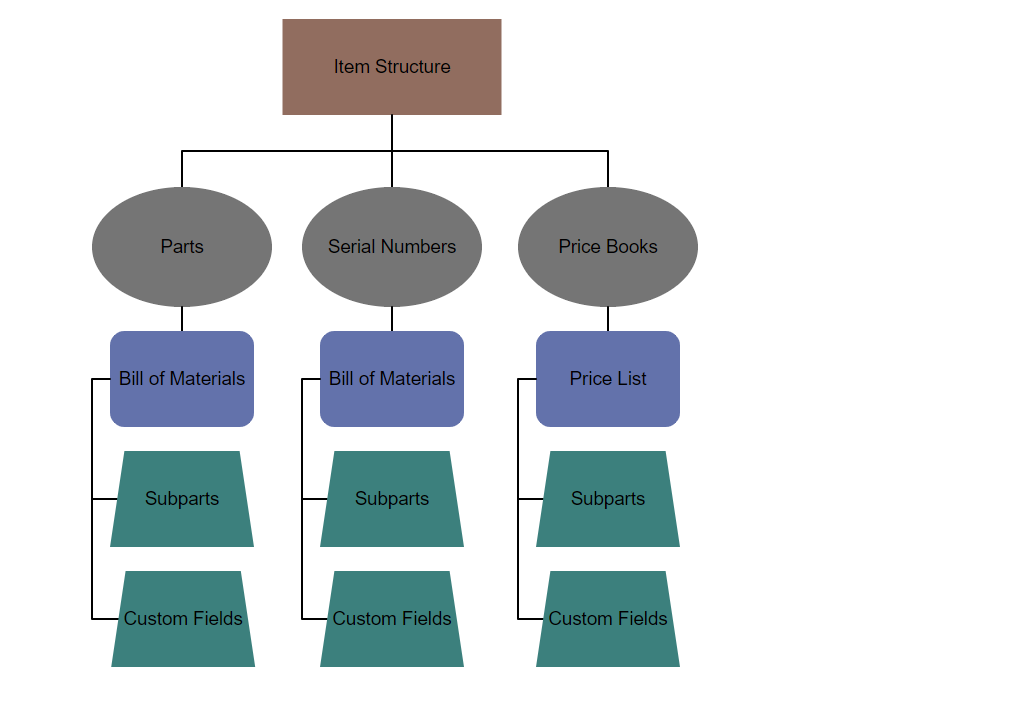
Items can be created manually or uploaded from a spreadsheet. To create an item from a spreadsheet, you must know the item’s price book, serial number, parts, bill of materials, price list, and any applicable subparts and custom fields. Because items in Oracle CPQ Cloud consists of parts, the words Item and Part tend to be used interchangeably throughout the user interface.
The following graphic displays the item structure:
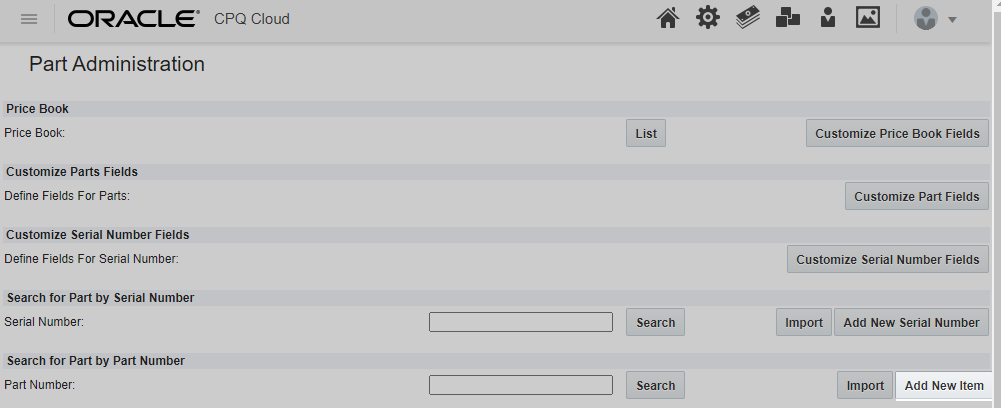
 The easiest way to create an item manually is to navigate to Admin > Items > Add New Item.
When you select Items, it takes you to the Part Administration page and the Add New Item button is in the Search for Part by Part Number pane. This is a perfect example of Oracle using the words for Part and Item interchangeably.
The following screenshot displays the Add New Item button on the Part Administration page:

Each Item must have a part number. Then you can define how the Item can be sold. Items can be sold in one of the following ways:
- Direct Buy = the product can be sold individually
- Buy Parent Part = the product can be sold as included with a parent product
- Buy as Recommended Item Only = the product can be sold as bundled but not individually
An example of an item that you would use the Buy Parent Part selling model with would be the hard drive of a laptop when you are a seller of complete laptops only. You have a laptop that can contain multiple hard drives. The hard drives are procured separately. The hard drives have their own serial numbers, and the laptop casings have their own serial numbers as well. But people cannot buy the hard drive by itself; they also must buy the laptop it goes in.
An example of an item that would use the Buy as Recommended Item Only selling model could be an external mouse for the laptop. You do not sell mice individually, but if people want to add a mouse to their laptop order, they can.
Once you have defined an Item’s part number and how that item can be sold, you can successfully create the item. The other fields on the page do not have to be configured at this time; however, it is recommended to add in the pricing information.
Once all the information for the item is entered, you select the Add button and your Item is created!
You can search for the item using the Part Number search field in the Search for Part-by-Part Number field at any time to finish filling out the item information or to edit the item information.
To add multiple items at once, best practice is to bulk download existing items and use the resulting excel file as a template to fill out with the new items you wish to add. This ensures you are including all necessary information in columns that Oracle can interpret.
For an in depth look at the upload process, check out ENGAGE by Maverick. ENGAGE is Maverick Solutions’ subscription-based training content on all Oracle Cloud applications. Speak with one of our training experts today!
But how and why does having items help us?
Creating pre-configured items in Oracle CPQ Cloud allows you to send quotes to customers quickly and accurately as soon as they are ready for them. It also allows you to quickly create transactions.
We mentioned before that an item is anything with its own serial number.
Say you have a business that sells Red and Green laptops. Each laptop can come with three different hard drives and your choice of 7 colors of mice.
In a traditional inventory system, you would need items:
- Red laptop with hard drive 1 and mouse color 1
- Red laptop with hard drive 2 and mouse color 1
- Red laptop with hard drive 3 and mouse color 1
Etc. Until you had 42 different items, one for every possible configuration. However, with CPQ Items, you can create
- Red Laptop
- Green Laptop
- Hard Drive 1
- Hard Drive 2
- Hard Drive 3
- And an item for each mouse color
That is a total of 12 items.
12 items are much easier to deal with than 42. Scale this up to your business and you can quickly see how configurable items simplifies the process.
Instead of searching through a long list of items to create your transaction, if you already have items configured, you can quickly create a transaction by selecting the items from the product family page, select the configuration of the item needed, and then create the transaction. Once you enter the information for where the transaction is going, you are done! Simple and quick.
So how are items helpful?
Items in Oracle CPQ Cloud are helpful because they simplify transaction creation.
But wait,
You may be asking yourself, “Wait, why am I creating a transaction if I haven’t created a quote yet?”
That’s how Oracle’s commerce flow works.
Oracle’s commerce flow works like this:
- Initiate Transaction (configuration): Acquire customer data from Customer Relationship Management (CRM) or manual entry.
- Add Lines (configuration): Use the Configurator to add part lines (Items).
- Create Transaction (configuration to commerce): Click the Create Transaction button to move from Configuration to Commerce.
- Pricing/Save (commerce): Apply discounts and markups and save the transaction in the system.
- Submit/Approvals (commerce): Submit the transaction for approval.
- Create Order (commerce): Use the final transaction data to create a formal order.
- Create Quote (document designer): Use Document Designer to create quote documents for customers.
- Deliver Quote (document designer): Send the quote to the customer.
From this flow you can see that unlike in a procurement flow where you create a quote, then an order, then a transaction, in Oracle CPQ Cloud you do the opposite. This creates a system where if a customer accepts a quote, the order and transaction go through automatically as opposed to needing to then go back and generate them.
Think about your current price and quote flow. Do you do the following:
- Get customer information
- Send quote
- Get quote approved
- Create invoice
- Send invoice
- Get invoice paid
- Fulfill transaction
That is a very typical flow, but just think about how time consuming that is to nurture your lead through each step of that process.
By using CPQ and configuring all your items in the system for easy access, the Sales lead no longer has to monitor the customer through multiple documents to ensure a complete sale. A quote is sent, a quote is paid, and the hot lead is now a full-fledged client.
So why are items helpful?
Simplified quote creation and execution allows sales leads to focus their efforts on new leads in the pipeline more than leads in limbo between quote and invoice. As we talked about before in our From Lead to Customer in Oracle Sales Cloud blog article, once a quote is accepted, the purchase and sales order are created automatically by the system for quick confirmation and the Sales lead has successfully closed the sale.
Any additional questions?
Our Oracle CPQ course, available through ENGAGE by Maverick, walks you through the entirety of Oracle CPQ Cloud, from implementation and configuration, to end user processes like creating and approving transactions.
ENGAGE by Maverick is Maverick Solutions’ subscription-based training content on all Oracle Cloud applications. We create and customize our training content to match your Oracle system, and we update our training to match every Oracle update.
If you still have questions, would like customized content showing how to perform these processes specifically within your organization with your templates and options, or want access to our full suite of Oracle topics and tutorials, then you want to learn more about ENGAGE by Maverick! Speak with one of our training experts today to take full advantage of your Oracle Suite.
The article was written for Oracle release 21A. Due to the nature of Cloud software and updates, this article may no longer be accurate. If you would like access to the most up-to-date version, please reach out to our team to learn more.


